Get Inspired With These Homemade Costume Ideas
Compiled by Katie Beltramo
We might be biased, but we think KidsOutAndAbout readers and staff are some of the smartest, most creative people around! So we asked for ideas on their favorite homemade Halloween costumes for kids with tips on how to get started.
Carrot
by Susan
To create the carrot-top head, Susan added a carrot-top to a green stocking cap. She cut a carrot top shape from a large piece of green felt, then she used a combination of green floral wire and Phoomph (a double-sided adhesive for fabric) added to the middle of the carrot-top so that it would stand up (for this carrot, top, Susan ended up crafting a "sandwich" of felt, Phoomph, wire, Phoomph, and felt). She left the bottom four inches of felt plain, then pushed them through a hole in the stocking cap and sewed it inside. She sewed a green ribbon inside the cap by both ears so that they could tie it under her son's chin to keep the top-heavy hat in place.
Susan dressed her son in all orange clothes for the carrot body.
Piano
By Deb
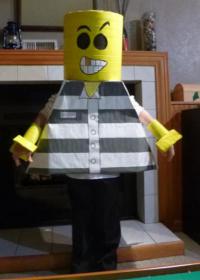
LEGO Guy
By Mandy
Mandy followed the directions at Everyday Mom Ideas here with just a few little modifications.
She used yellow duct tape instead of yellow paint on the head.
For the hands, she used three foam “coozies.” Cut the bottom out of two to slide over the hands and cut the third in half and used the yellow duct tape to form the lego type hands.
Mary Poppins and Bert
By Susan
Susan found clothes in the closet and at consignment sales for the bulk of her kids' outfits. The she sewed red ties for accessories--okay, Nana sewed the ties. But if you're not a seamstress, ribbons or scavenged ties would work just as well.
From there, the props make the outfit. Mary Poppins needs an umbrella and/or a floral carpet bag, Bert has a tambourine, but bells, a harmonica, or a spray-painted black broom would work just about as well.
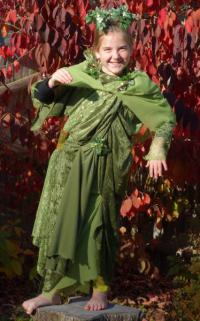
Dryad
By Katie
Katie's daughter wanted to be a dryad, or tree nymph, but this would work for any fairy sort of creature, especially if your child has strong opinions about exactly how their costume should look.
They purchased fabric and accessories like faux bark, faux ivy vines, and a bird's nest at a craft store. Then they hot-glue-gunned the different elements in stages, starting by draping one fabric, toga-style, and using the hot glue gun to fix it into place, then letting it cool and dry before adding additional fabric layers and, finally, the decorative accessories.
See the full details at Katie's blog, Capital District Fun.
Owl
By Arsenia
Arsenia started with a leotard with a little skirt. She cut strips of fabric from an old shirt and glued the strips, row by row, onto the skirt for added
"poofiness." Then she glued on leaf shapes cut out of felt along the skirt, followed by plenty of feathers that she glued onto the felt.
She accessorized with brown tights, a fur vest, and an owl winter hat for extra cuteness.
Pizza Slice
By Robin
Robin scored a large box and cut out two matching triangles that she'd measured to reach from her daughter's shoulder to just below her knees knee. From there, it was a lot of hot-glue-gun and felt: yellow felt on both sides of the back triangle for crust. For the front, red felt for sauces, whie for cheese, red felt for pepperoni, tan felt for onions, black felt for olives, or any othe rtoppings you want. For the front crust, Robin left a little extra space, pillow-style, and added fiberfill before sticking the edges into place.
She attached straps to the front and the back to fit over the shoulders, cut out a cardboard circle and covered it with red felt to make a pepperoni hat, then glued on elastic straps so that it would stay on her daughter's head.
A local pizza place provided a small pizza box to use as a candy bag. Robin glued the top and bottom together and cut out an opening on one side to drop candy into, then attached handles to the box for easy carrying.
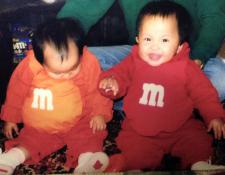
M&Ms
 By Carol
Carol started with her twin daughters’ red and orange sweaters and matching color pants. She made two matching pillows in each color, one for the front and one for the back of each. She put straps over the shoulders and at both sides of the waist and used Velcro to close one side. Then she cut a white M and sewed it in the middle of the pillows. Don’t sew? No problem! Buy inexpensive round pillows, hot glue the M in place, and attach the straps in place using pins.
See? These are completely do-able!
If none of these costumes are just right, surely you can adapt some techniques to fit whatever your little ghost or goblin is passionate about this year! Scavenge some clothes, gather felt, fabric, or cardboard, and fire up that hot glue gun: you've got this.
© 2021, KidsOutAndabout.com

